
The second installment of Kaitlin Manning's new series on taking better pictures of rare books and ephemera. (Review the first part here...)
Setting up a home studio does not need to be an expensive affair. Besides your camera, there are two basic elements to a studio: a backdrop and lighting. For the backdrop, the simplest and most effective method is to create a “scoop” background (sometimes called an endless background) where there is no visible horizon line. This effect can be created very easily: place a box or other upright, sturdy object (even a folding chair will do) on your workspace and drape a large piece of paper or fabric over it so that it curves gently down onto the surface on which you will place your books. I find that a large roll of butcher paper works quite well – simply roll out a fresh background whenever it gets dirty or wrinkled (black, white, or a neutral grey are best). You can find this at arts and crafts shops or specialty photography shops for a very reasonable price.
.jpg) Lighting your workspace will take a little more effort and experimentation, but shouldn’t be intimidating. The basic idea is to fill your background with a soft, diffuse light in order to capture every detail and avoid any harsh shadows. This effect can be achieved in several ways: you can buy several desk lamps (the clip-on kind works really well), or a couple of entry-level, standing flood lamps at a photography shop ($100 will get you a fine set at B & H Photo). Set these lights up on either side of your workspace so that you get a light source from at least two directions. Direct light can look very harsh and uneven, so you will also need some way to diffuse the light coming from the lamps. Very basically, this needs to be a translucent material between your light and the objects you plan to photograph. For smaller objects, a light tent will do the trick (though these can get expensive); you may also want to experiment with a material like drafting film to achieve a similar (and much more economical) effect. I’ve even seen people use shower curtains for this purpose! Just remember that lights get hot; don’t use anything that can burn or melt. Plenty of websites out there will steer you toward cheap solutions – simply google “cheap light diffuser” and watch the results pile up.
Lighting your workspace will take a little more effort and experimentation, but shouldn’t be intimidating. The basic idea is to fill your background with a soft, diffuse light in order to capture every detail and avoid any harsh shadows. This effect can be achieved in several ways: you can buy several desk lamps (the clip-on kind works really well), or a couple of entry-level, standing flood lamps at a photography shop ($100 will get you a fine set at B & H Photo). Set these lights up on either side of your workspace so that you get a light source from at least two directions. Direct light can look very harsh and uneven, so you will also need some way to diffuse the light coming from the lamps. Very basically, this needs to be a translucent material between your light and the objects you plan to photograph. For smaller objects, a light tent will do the trick (though these can get expensive); you may also want to experiment with a material like drafting film to achieve a similar (and much more economical) effect. I’ve even seen people use shower curtains for this purpose! Just remember that lights get hot; don’t use anything that can burn or melt. Plenty of websites out there will steer you toward cheap solutions – simply google “cheap light diffuser” and watch the results pile up.
In addition to the two basic components of a home studio listed above, you will find that a variety of books ends, stands, weights, and clips will help you set up your shots. Many of these you probably already have lying around from book fairs, so experiment with various props as you go along. As always, when setting up a shot, the safety of your books and ephemera should always be a concern. If joints are tender or there are other condition issues, consider shooting in a way that will minimize the potential for damage. It may be necessary to shoot only the binding, or just the title page, for example.
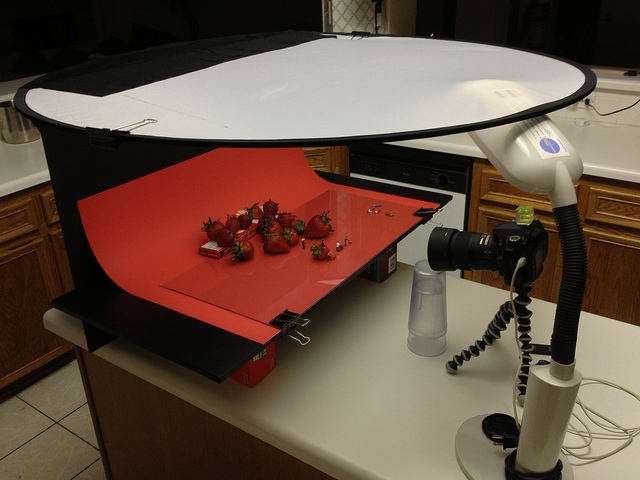
A simple DIY-photography setup for photographing small objects. A desk lamp, cheap tripod, remote trigger, paper as a backdrop, and a diffuser. (Source: Flickr/JD Hancock)
Other useful accessories to make your life easier are:
1. A UV filter: for protecting your lens in the event that you drop your camera or scrape it against something. The filter takes the brunt of the damage and your expensive glass is spared. Price: splurge and get a decent one for $25 - $50. Cheaper ones can sometimes cause color distortion.
2. Lens brush or microfiber cloth: for getting the little nasties off your lens and ensuring a clean photograph. If you are using one of these and still getting dust-like particles in your images, there might be dust in the camera’s sensor. ALWAYS get a professional to clean your sensor unless you are very sure of your skills. Cleaning a sensor yourself with one of those DIY kits might further damage your equipment. Price (for a microfiber cloth): under $5.
3. Grey card: for getting your white balance calibrated correctly (note: if you already use a neutral grey background, there is no need for a grey card too). Price: there are a lot of products out there with all the bells and whistles....which are really not necessary. Get something basic – under $5.
4. Tripod: for keeping your camera still while shooting. This is especially important for close up shots when you need to minimize camera shake (which can make your images look blurry). Price: these run the gamut and can get very expensive. Many options around $100 will serve you well, but read the reviews and pick something that makes sense with your setup.
5. Remote trigger: another tool to minimize camera shake (and should only be used in tandem with a tripod). This is especially helpful if you use a DSLR and need to shoot speeds under 1/60 of a second. Price: shop around and don’t be afraid of something “off brand” here (i.e. not built by Cannon or Nikon). Just remember to read the fine print and make sure it will work with your specific camera. I got mine for under $15 and it works perfectly.
Read "A Guide to Taking Better Photos" part 1...
Read "A Guide to Taking Better Photos" part 3...
Read "A Guide to Taking Better Photos" part 4...
(Desk lamp image source: Digital Camera World, which has this excellent article if you want more information.)